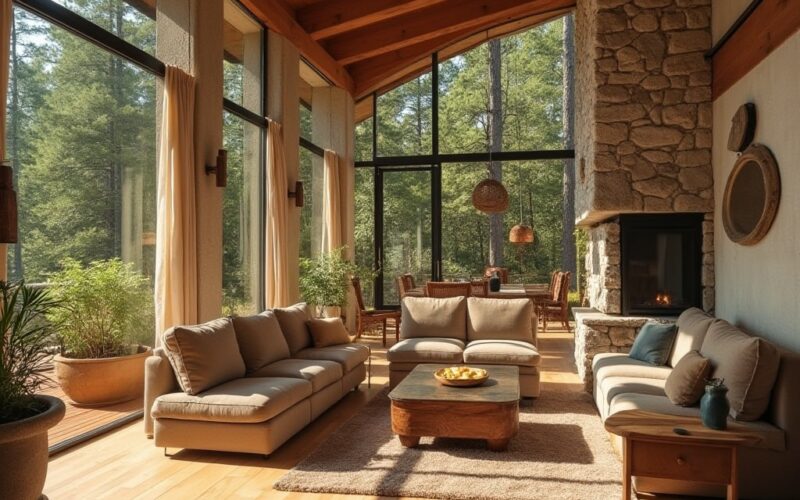
If you live on South Century Drive, near Shevlin Park, or in a quiet pocket of Sunriver where the pines press right up against your backyard, you already know something city dwellers do not. Living on the edge of the Deschutes National Forest is beautiful, but it is not gentle on your home.
Fine volcanic sand clings to hiking shoes. Pine needles hitch rides on dog fur. Sticky sap drops from boots onto living room floors. Cabin decks funnel grit straight into entryways. Over time, these small, daily invasions leave their mark. Scratches. Dull finishes. Stains that refuse to budge.
For edge-of-town homeowners, outdoor hobbyists, and second-home owners, the question is not whether nature will come inside. It is how to choose flooring that can handle it. If you are searching for the best flooring for homes in wooded areas in Bend, OR, the answer lies in a combination of texture, durability, and smart design. At Northwest Tile Supply, we specialize in materials and installation strategies built specifically for forest living in Central Oregon.
The Forest Effect: Why Standard Floors Fail in Bend’s Wooded Areas
Homes near the Deschutes National Forest face unique challenges. Unlike urban environments, where dust and light debris are the primary concerns, forest-edge homes contend with constant organic material and abrasive grit.
Volcanic sand acts like fine sandpaper underfoot. Even small amounts can dull smooth finishes over time. Pine needles, though seemingly harmless, carry tiny particles that grind against surfaces when stepped on. Add moisture from snowmelt or early morning dew, and that grit becomes even more abrasive.
For mountain bikers, trail runners, and hikers, the problem intensifies. Shoes and gear bring in red cinder dust from trails. Resin from pine trees sticks to soles and transfers indoors. Cabin and vacation rental owners see even more wear, as guests transition repeatedly from deck to living room without always pausing to clean footwear.
Traditional high-gloss hardwood and deep-pile carpet rarely survive long under these conditions. Gloss finishes highlight every scratch. Carpets trap pine needles deep in fibers, turning routine cleaning into a weekly chore.
Understanding these realities is the first step toward choosing the best flooring for homes in wooded areas in Bend, OR. The right material must embrace the forest lifestyle rather than fight it.
Texture as a Secret Weapon: Hiding Wear Before It Happens
One of the most overlooked strategies for forest homes is choosing flooring with texture and visual camouflage. Wire-brushed and distressed finishes are not just design trends. They are practical solutions for High Desert living.
Wire-brushed hardwood features subtle ridges that follow the grain of the wood. These textures help mask small scratches and fine sand marks that would be glaringly obvious on a smooth surface. Distressed finishes offer natural character, so minor dings blend into the aesthetic rather than standing out.
Luxury vinyl plank with embossed textures provides a similar advantage. When paired with wood-look visuals that incorporate natural variation, these floors disguise everyday wear beautifully. For homeowners who prioritize low maintenance, this means less stress over every scuff.
At Northwest Tile Supply, we guide clients toward finishes that align with both their style and lifestyle. Forest homes benefit from mid-tone hues and grain variation that naturally conceal grit. Our showroom features Bend-proof samples chosen specifically for properties bordering wooded areas.
The goal is not to eliminate wear entirely. It is to choose materials that age gracefully in an environment where nature is always present.
Superior Sealants: Guarding Against Pine Sap and Red Cinder Dust
Beyond texture, the finish layer plays a critical role in durability. Pine sap and red cinder dust can stain or embed into lower-quality surfaces. Once that happens, the damage may be permanent.
High-performance topcoats such as ceramic bead or aluminum oxide finishes provide a protective shield. These advanced sealants increase scratch resistance and reduce the likelihood of staining. They create a barrier that resists moisture and sticky residues, making cleanup faster and more effective.
For homes in Sunriver or near Shevlin Park, this level of protection is essential. Snow tracked inside during winter months often melts near entryways, creating a mix of moisture and grit. Without proper sealing, that combination can seep into seams or leave visible marks.
Northwest Tile Supply offers products engineered for these exact conditions. We prioritize brands known for high-quality wear layers and superior sealants. When clients ask about the best flooring for homes in wooded areas in Bend, OR, we focus not just on appearance but on finish technology.
A beautiful floor is important. A floor that remains beautiful after years of forest traffic is even more so.
Smart Transitions: Designing Entryways That Work
Flooring performance does not rely on materials alone. Layout and transition design matter just as much. Forest homes benefit greatly from intentional drop zones that trap grit before it spreads throughout the main living area.
Custom tile or stone entryways create a durable buffer between outdoors and indoors. These surfaces handle heavy wear and are easy to sweep clean. From there, transitions into luxury vinyl plank or hardwood should be seamless but strategic.
At Northwest Tile Supply, we help design integrated entry solutions that suit your home’s architecture. For example, a slate-look porcelain tile in the mudroom can flow naturally into a textured LVP in the living area. This creates a visual distinction while protecting the most trafficked zones.
Cabin and second-home owners especially benefit from this approach. Guests moving in and out with gear may not follow strict no-shoes policies. A well-designed entry transition absorbs much of that impact.
For edge-of-town homeowners, thoughtful design reduces daily maintenance. Instead of constantly vacuuming pine needles from every corner, debris is contained near the entrance.
Sustainable Choices for Forest Living
Many Bend residents choose to live near the National Forest because they value the environment. Flooring decisions can reflect that same ethos.
FSC-certified wood options ensure responsible forest management practices. Recycled-content luxury vinyl and tile products reduce material waste. Selecting durable materials that last longer also supports sustainability by minimizing replacement cycles.
At Northwest Tile Supply, we understand that eco-conscious values are important to many of our clients. We offer products that align with the “Keep Bend Central Oregon” spirit. Living near the forest often deepens appreciation for natural resources, and your home’s interior can reflect that respect.
Sustainability does not mean sacrificing durability. In fact, many of the most resilient flooring products today are designed with both performance and environmental responsibility in mind.
Choosing the best flooring for homes in wooded areas in Bend, OR requires more than browsing a catalog. It demands local knowledge. Our team members live this lifestyle. We know what it means to track in sand after a Phil’s Trail ride or sweep pine needles off a Shevlin Park deck.
When you visit our showroom, you are not just viewing samples. You are seeing materials tested against Central Oregon’s real-world conditions. We help you select textures that hide wear, sealants that resist staining, and transitions that contain debris before it spreads.
Living on the edge of the Deschutes National Forest is a privilege. Your floors should be built to handle it. With the right materials and thoughtful design, your home can embrace the forest without being worn down by it.
Living in Bend means you probably don’t tiptoe through life. You head out before sunrise for a skin up Mount Bachelor. You load the truck with bikes and head to Phil’s Trail. You let the dog sprint through the Deschutes and shake off somewhere between the driveway and the kitchen. It is part of what makes Bend special. However, it is also tough on your floors.
Mud, melting snow, and the fine volcanic cinders that define Central Oregon can quietly destroy delicate materials. Scratches from gravel, water damage near entryways, and warping from seasonal dryness are common complaints for homeowners across Northwest Crossing, Tetherow, and neighborhoods on both sides of town. If you are searching for the best waterproof flooring for snow and mud in Bend, OR, you are not alone.
At Northwest Tile Supply, we see firsthand what happens when flooring is chosen for looks alone instead of lifestyle. The good news is that you do not have to sacrifice style for durability. With the right materials, installation methods, and climate expertise, your home can handle Bend’s elements without losing its mountain modern edge.
Bend’s Unique Flooring Enemies: Snow, Cinders, and High Desert Air
Not all climates are created equal. Bend’s combination of winter snow, shoulder-season mud, and year-round volcanic grit creates a unique set of challenges for interior surfaces. The cinders and sandy soil found on local trails are particularly abrasive. When tracked indoors, they act like fine sandpaper against traditional hardwood and low-quality laminate.
Add melting snow from ski boots sitting by the door, and you introduce moisture that seeps into seams and subfloors. Even if you wipe it up quickly, repeated exposure can lead to swelling or staining. Dog owners know this scenario well. Wet paws, energetic zoomies, and the occasional accident all test a floor’s resilience.
Then there is Bend’s low humidity. High desert air can cause certain materials to shrink, gap, or crack if they are not properly acclimated before installation. National big box retailers may sell flooring designed for more humid regions, but without local knowledge, those products often fail prematurely here.
Understanding these local hazards is the first step in choosing the best waterproof flooring for snow and mud in Bend, OR. It is not just about water resistance. It is about abrasion resistance, proper installation, and climate compatibility.
Cinder-Tested Durability: What Actually Holds Up
For active adventurers and property managers alike, durability is non-negotiable. Floors must withstand bike cleats, ski boots, dog nails, and constant foot traffic. One of the most reliable solutions in Bend homes today is high-quality luxury vinyl plank with a 20mil or greater wear layer.
Not all vinyl flooring is equal. Lower-grade options may look appealing at first, but their thin wear layers scratch easily under abrasive debris. At Northwest Tile Supply, we carry brands specifically chosen for their cinder-tested durability. These products are engineered to resist the fine volcanic rock and sand common in Central Oregon.
Porcelain tile is another strong contender, especially in entryways and mudrooms. Properly installed tile resists scratches, handles moisture, and provides long-term performance. For mountain modern homeowners who want a high-end aesthetic, large-format porcelain can mimic natural stone or wood without the maintenance headaches.
When customers visit our showroom, they can see Bend-proof samples that have been real-world tested. These are not theoretical solutions. Our team members live the same outdoor lifestyle. We know what works in a Westside bungalow versus an Eastside ranch because we have lived it ourselves.
Moisture-Resistant Installation Makes the Difference
Even the most durable flooring can fail if it is not installed correctly. In Bend, proper moisture-resistant installation is critical. Snow melts. Wet gear drips. Dogs shake off river water. Entryways become high-risk zones.
A high-quality moisture barrier beneath the flooring protects the subfloor from water infiltration. Without it, repeated exposure to moisture can lead to mold growth or structural damage. Seam sealing and proper edge detailing further reduce risk in high-traffic areas.
Northwest Tile Supply emphasizes installation techniques designed specifically for Bend’s conditions. We understand that entryways and mudrooms need extra attention. Expansion gaps must be properly calculated to account for temperature fluctuations. Subfloors must be prepared carefully to ensure long-term stability.
For short-term rental owners managing Airbnbs, this level of installation detail protects ROI. Guests do not always remove boots. Skis may lean against walls. Flooring must withstand constant turnover without requiring frequent repairs.
Choosing the best waterproof flooring for snow and mud in Bend, OR, is only part of the equation. Installing it with Bend’s climate in mind is what ensures lasting performance.
Local Climate Acclimation: The Hidden Key to Longevity
Bend’s dry air surprises many new homeowners. Materials that perform well in coastal or humid environments may shrink or gap here. Hardwood flooring, in particular, is vulnerable if not properly acclimated.
Before installation, flooring materials should be allowed to adjust to the home’s interior humidity levels. This process reduces the risk of expansion and contraction issues later. Unfortunately, rushed installations from national chains often skip this step.
At Northwest Tile Supply, climate acclimation is standard practice. We understand how Central Oregon’s dry winters and mild summers affect materials over time. By taking the time to properly acclimate flooring before installation, we prevent the shrinking and cracking that can undermine an otherwise beautiful floor.
This attention to detail is especially important for mountain modern homeowners investing in high-end finishes. The aesthetic should remain as impressive years later as it did on installation day.
Style Meets Function in Bend Homes
Durability does not mean sacrificing design. Bend’s architectural styles range from cozy craftsman cottages to sleek modern builds in Tetherow. The best waterproof flooring for snow and mud in Bend, OR should complement these aesthetics while standing up to real life.
Luxury vinyl plank now offers realistic wood textures and wide-plank visuals that align perfectly with mountain modern design. Porcelain tile comes in finishes that echo basalt, slate, and other natural elements found throughout Central Oregon.
For active adventurers, easy cleanup is just as important as appearance. Floors should handle a quick sweep of cinders and a damp mop after a snowy day without special treatments. Dog owners need surfaces that resist scratches and clean up easily after muddy trail runs.
At Northwest Tile Supply, our showroom reflects these priorities. We invite customers to explore samples that have been chosen for Bend’s unique environment. Our staff are locals who ski, hike, bike, and paddle just like you. We understand that your home is both a sanctuary and a basecamp.
When you choose flooring designed specifically for Bend living, you protect your investment and preserve your lifestyle. Mud, snow, and cinders are not going away. However, with the right materials and expert installation, they do not have to win.
If you’re ready to upgrade your floors, visit Northwest Tile Supply and see what Bend-proof really looks like. Your home deserves materials that can handle the High Desert while still reflecting the beauty of Central Oregon.
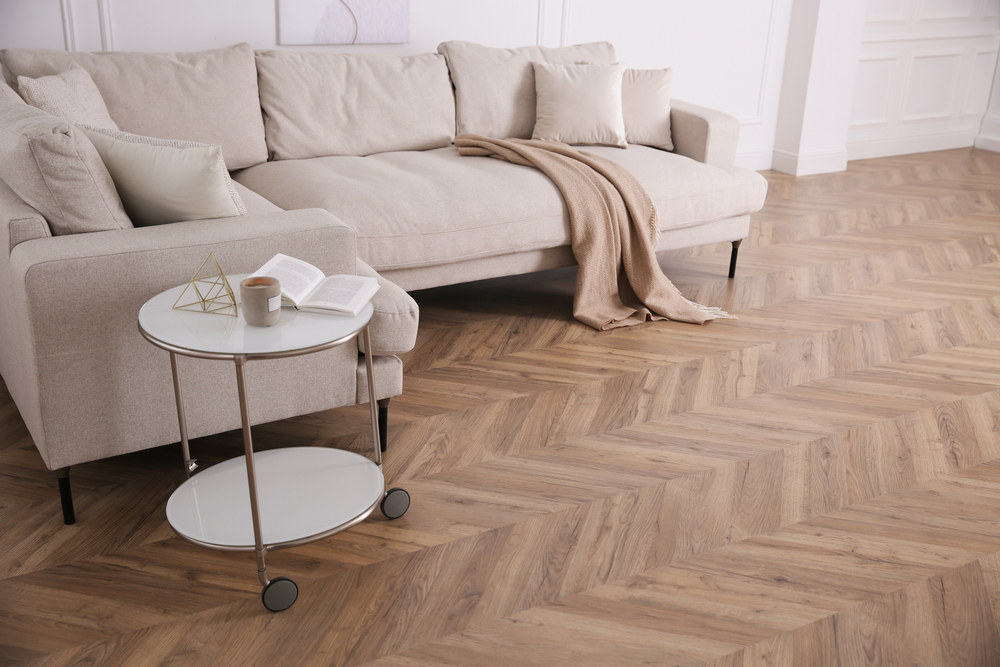
Choosing the right flooring for an active home is a decision that balances beauty, durability, and practicality. In Bend, OR, a place known for outdoor adventure and energetic family life, the demand for floors that can keep up with day-to-day wear is growing rapidly. For years, hardwood floors were considered the gold standard for style and longevity, but the rise of Luxury Vinyl Tile (LVT) has shifted the conversation. High-durability LVT is not just a strong contender; it’s fast becoming the preferred choice for homeowners seeking a versatile and resilient flooring solution. Here’s why LVT is overpowering hardwood and why more locals are turning to their trusted flooring store in Bend, OR, to make the switch.
Living in Bend, OR: Why Flooring Matters
Bend is a community that thrives on movement. Between hiking Smith Rock, biking through Phil’s Trail, and skiing at Mt. Bachelor, locals are constantly tracking in dirt, snow, and mud. Families here often include energetic kids, large dogs, and weekend warriors, all of whom contribute to the wear and tear on floors. Traditional hardwood, while beautiful, can struggle under this type of pressure. Scratches from pet claws, dents from dropped gear, and moisture from wet shoes can quickly compromise the look and integrity of real wood.
High-durability LVT, on the other hand, is engineered to take a beating. With waterproof cores, strong wear layers, and realistic textures that mimic wood and stone, LVT stands up to Bend’s active lifestyle without breaking a sweat. It’s a practical match for a city that expects its homes to work as hard as its people do.
Understanding the Appeal of LVT
Luxury Vinyl Tile is not your grandmother’s vinyl. Today’s LVT is a sophisticated, multi-layered flooring product that delivers on all fronts: appearance, function, and longevity. Homeowners walking into a flooring store in Bend, OR, are often surprised by how closely LVT resembles hardwood, not only in appearance but in texture and warmth underfoot.
This resemblance comes from advanced photographic technology and embossing techniques that replicate wood grains, knots, and even imperfections with stunning accuracy. But LVT goes a step further by solving the problems that plague natural wood. It resists moisture, won’t swell in humid conditions, and is far less prone to scratches and dents.
For active households, this means fewer worries. Spilled juice, snow-melt puddles, or muddy paw prints are no longer a flooring emergency. The surface is easy to clean, and the material holds its shape and look over time. Bend homeowners no longer have to choose between style and function. LVT gives them both.
Durability Where It Counts
Hardwood is strong, but it’s not invincible. Over time, even the toughest woods like oak or maple begin to show signs of distress in high-traffic areas. Refinishing is an option, but it’s costly, time-consuming, and not something most busy families want to deal with every few years.
This is where high-durability LVT truly shines. Its protective top layer is engineered to withstand impact, abrasion, and water, making it an ideal option for kitchens, entryways, laundry rooms, and bathrooms. In a place like Bend, where outdoor adventure is a lifestyle, these qualities are essential.
Another point in LVT’s favor is its performance in temperature fluctuations. Bend’s climate can range from snowy winters to hot summers. LVT remains dimensionally stable, meaning it won’t expand, contract, or warp the way wood can when subjected to environmental changes. For homeowners who want peace of mind year-round, this is a major advantage.
Cost, Maintenance, and Installation Benefits
From a financial standpoint, LVT is often more affordable than hardwood, both in upfront cost and long-term maintenance. For many Bend residents building new homes or remodeling older ones, budget is a key factor. LVT allows them to achieve the look of real wood without the expense associated with premium hardwood materials and finishes.
Maintenance is also easier. Hardwood floors require regular polishing, careful cleaning, and sometimes refinishing. LVT needs only basic sweeping and occasional damp mopping to stay looking new. This low-maintenance routine fits perfectly into the fast-paced, outdoor-focused lifestyle of Bend families.
Installation is another area where LVT wins. Many products feature click-lock or loose-lay systems that make for faster and less invasive installation. Some homeowners even tackle the job themselves. This not only saves money but also minimizes disruption, especially in busy households that can’t afford to lose access to key rooms for extended periods.
Aesthetics and Versatility
LVT has broken through previous limitations to offer a wide range of colors, styles, and textures. Whether you love the rustic charm of weathered barnwood, the sleek look of gray-washed planks, or the warmth of golden oak, there’s an LVT design that fits your aesthetic. This is a key reason homeowners are increasingly drawn to LVT when visiting a flooring store in Bend, OR.
Beyond color, LVT comes in different shapes and sizes, including long planks and patterned tiles. This opens up endless design possibilities, from traditional hardwood-inspired layouts to creative geometric designs. In addition to wood looks, stone and ceramic styles are available, giving LVT the flexibility to be used throughout the entire home while maintaining a cohesive appearance.
Its quiet, cushioned feel underfoot adds another layer of comfort, especially in homes with young children or aging residents who benefit from a softer, warmer floor. In essence, LVT is not only tough but also thoughtfully designed to enhance the livability of every room.
Conclusion
The flooring needs of Bend, OR, residents are unique. Active lifestyles, varied climates, and family-focused homes require materials that perform under pressure without sacrificing style. While hardwood still holds a place in the hearts of many, the shift toward high-durability LVT is clear and accelerating.
LVT offers unmatched benefits for households that want resilience, easy upkeep, and aesthetic appeal all in one package. It thrives where hardwood often struggles: in moisture-prone areas, under heavy use, and through environmental changes. It installs faster, costs less, and holds up longer. For those looking to upgrade their floors without compromise, a visit to a trusted flooring store in Bend, OR, will likely end in a confident choice: Luxury Vinyl Tile.
As LVT continues to evolve, it’s poised to remain the flooring of choice for Bend homeowners who want surfaces that work as hard as they play. It may not have the centuries-old prestige of hardwood, but in today’s world, function and flexibility often come first. And in those categories, LVT is leading the way.
Need a Local Flooring Store Near You?
We’d love to help bring your next project to life! At Northwest Tile Supply, Inc., our knowledgeable and friendly team is here to guide you through our wide selection of high-quality stone and porcelain tiles. Whether you’re a contractor tackling a big job or a homeowner planning a renovation, our showroom in Bend is the perfect place to get inspired and find exactly what you need. Give us a call or stop by today—we’re excited to work with you and help make your vision a reality!
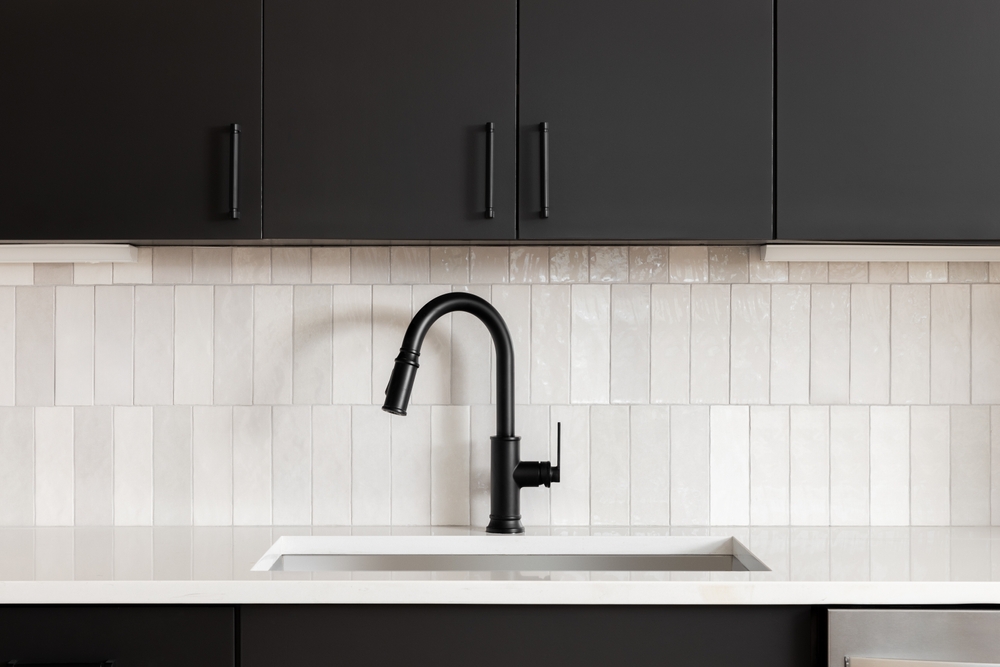
A kitchen backsplash can instantly change the entire tone and aesthetic of your space. Whether you are planning a full remodel or simply want to refresh your cooking area, choosing the right backsplash is a key design decision. In 2026, ceramic and porcelain tiles are taking center stage in kitchens across the country, especially in design-forward communities like Bend, Oregon. These materials combine beauty, function, and durability, making them a smart choice for homeowners who want style without sacrificing performance.
Let us explore the leading kitchen backsplash tile trends that are shaping interiors this year, with a focus on the versatility and appeal of ceramic and porcelain options.
The Rise of Statement Patterns and Bold Designs
One of the most exciting kitchen backsplash tile trends gaining popularity in Bend, Oregon and beyond is the use of bold patterns and high-contrast designs. Homeowners are moving away from safe, neutral tiles and embracing expressive visuals that make the backsplash the star of the kitchen.
Patterned ceramic tiles are a major part of this trend. Intricate Moroccan-inspired motifs, modern geometric layouts, and even vintage floral prints are all being used to infuse personality into kitchen spaces. In small doses, such as behind the stove or around a prep station, these tiles add flair without overwhelming the room. Porcelain tiles, known for their printed versatility, are also being produced with hyper-realistic patterns that mimic everything from traditional encaustic cement looks to contemporary digital designs.
The goal is to personalize the kitchen while maintaining cohesion with the rest of the home. These bold tiles are being paired with minimalist cabinetry and neutral countertops, allowing the backsplash to serve as an artful focal point.
Earthy Tones and Organic Textures
While bold patterns appeal to some, others are gravitating toward a different style trend: nature-inspired palettes and textures. Ceramic and porcelain tiles are perfectly suited to this aesthetic, offering both matte and textured finishes that resemble natural stone, hand-thrown pottery, and raw clay.
In Bend, Oregon, a city known for its deep connection to the outdoors, many homeowners are leaning into these earthy, organic tile choices. Warm terracotta hues, olive greens, sand tones, and muted blues are among the most requested colors this year. These tones evoke the surrounding high desert landscape, making them particularly resonant with local architecture and design.
Textured porcelain tiles that simulate natural surfaces such as limestone, slate, or wood grain bring an added tactile dimension to the backsplash. The surface irregularities catch light in interesting ways, creating visual depth even in monochromatic color schemes. This trend brings warmth and authenticity to the kitchen and aligns with broader movements toward biophilic design and sustainability.
Classic Shapes with a Modern Twist
Subway tiles have long been a kitchen staple, but in 2026, they are being reinvented in fresh and creative ways. Instead of the classic white 3×6 rectangle, designers are experimenting with alternative dimensions, unexpected colors, and unique installation patterns.
Long, narrow subway tiles in sage green or inky blue are being laid vertically or in chevron arrangements, transforming a familiar shape into a modern design element. Some ceramic tile lines are even offering sculptural variations with subtle reliefs or beveled edges that add dimensional interest.
Porcelain tiles are also stepping into the spotlight with their ability to mimic natural materials like marble or concrete, but in elongated or asymmetrical forms that break away from traditional layouts. These tiles are used to create refined yet contemporary backsplashes that work beautifully in both urban lofts and mountain homes.
In Bend, Oregon, this blend of classic and contemporary is especially popular among homeowners who want a timeless kitchen that still feels current. By using traditional materials in new ways, they achieve a balanced look that stands the test of time.
High-Gloss Finishes and Reflective Surfaces
Another major movement in kitchen backsplash tile trends is the return of glossy surfaces. High-gloss ceramic tiles are being embraced not just for their sleek appearance but also for their practical benefits. They reflect light, making kitchens feel larger and brighter, especially in areas with limited natural illumination.
Glazed ceramic tiles come in a wide range of shades and styles, from rich jewel tones to soft pastels. When paired with under-cabinet lighting, the gloss finish amplifies brightness and adds a polished elegance to the space.
Porcelain tiles with a glass-like finish are also gaining attention for their upscale appeal. Many are produced with a mirror-like sheen or a metallic glaze that catches light dramatically. This finish is particularly suited for modern kitchens where a sense of luxury and refinement is desired.
In the high desert climate of Bend, reflective tile finishes can also help counteract long, dark winters by introducing luminosity into interior spaces. Whether used in small mosaic formats or as large-format panels, these shiny surfaces are redefining what a modern backsplash can look like.
Seamless Backsplashes with Large Format Tiles
Minimalist design is still going strong, and large format tiles are playing a major role in this aesthetic. These oversized porcelain and ceramic tiles are being used to create nearly seamless backsplashes, reducing grout lines and contributing to a sleek, uninterrupted surface.
Large tiles can mimic the appearance of natural stone slabs, such as marble or quartzite, without the same maintenance concerns. Porcelain, in particular, offers a non-porous, highly durable surface that resists staining and moisture. For busy households or those who cook often, this makes a large format porcelain backsplash a highly practical choice.
This trend is ideal for open-concept kitchens where cohesion and flow are critical. Without frequent grout joints, the backsplash becomes an elegant backdrop that supports the kitchen’s overall design without overwhelming it.
In regions like Bend, Oregon, where modern mountain aesthetics often call for clean lines and simple palettes, large format tiles align well with architectural preferences. They pair nicely with concrete countertops, slab cabinet doors, and stainless steel appliances, bringing visual harmony and sophistication to the kitchen.
Conclusion
Ceramic and porcelain tiles continue to shape the future of kitchen design, offering limitless options for creativity, durability, and beauty. Whether you are drawn to bold patterns, earthy textures, updated classics, high-gloss glamour, or minimalist expanses, there is a tile solution that fits your personal style and practical needs.
In Bend, Oregon, where design often intersects with natural beauty and outdoor living, these backsplash trends provide homeowners with the perfect opportunity to blend aesthetics with functionality. From rustic cabins to sleek townhomes, the right backsplash can elevate your kitchen from ordinary to exceptional.
As you plan your next renovation or design refresh, consider the ways ceramic and porcelain tiles can transform your space. These materials are not only stylish but also stand the test of time, making them a wise investment in your home’s most used and loved room.
Need a Local Flooring Store Near You?
We’d love to help bring your next project to life! At Northwest Tile Supply, Inc., our knowledgeable and friendly team is here to guide you through our wide selection of high-quality stone and porcelain tiles. Whether you’re a contractor tackling a big job or a homeowner planning a renovation, our showroom in Bend is the perfect place to get inspired and find exactly what you need. Give us a call or stop by today—we’re excited to work with you and help make your vision a reality!
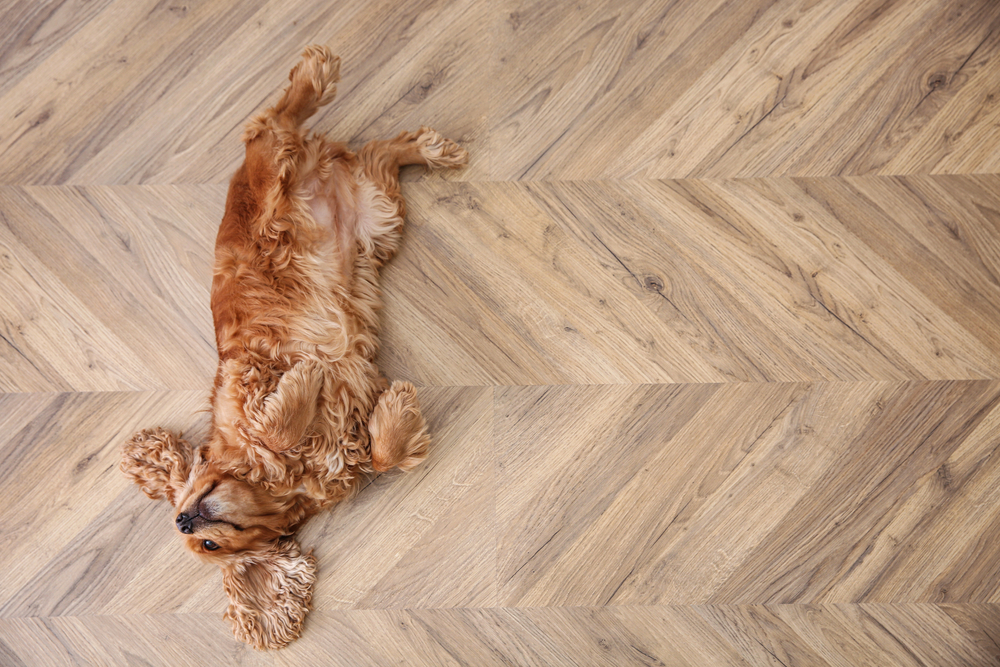
Pet owners in Bend, OR know all too well the joys and challenges of having high-energy, adventure-loving dogs. From hiking trails and forest runs to muddy riverbanks and snowy expeditions, your canine companions are constantly on the move, and they tend to bring the great outdoors right back into your home. While your dog’s spirited lifestyle brings excitement, it can be a nightmare for your flooring. Claws, dirt, water, and rough play can quickly damage traditional flooring surfaces. That’s why choosing scuff-resistant, pet-friendly flooring isn’t just a luxury; it’s a necessity.
In recent years, flooring manufacturers have responded to the growing demand for pet-conscious solutions with innovations that combine durability, style, and ease of maintenance. Among the leading choices, scratch resistant luxury vinyl tile for dogs stands out as a game changer. Let’s explore what makes certain floors better suited for your active pups and what you should look for when upgrading your space.
The Impact of Adventure Dogs on Household Floors
Living in a place like Bend, OR, your lifestyle probably includes regular outdoor activities that involve your pets. Whether it’s trekking through dusty trails or frolicking in the snow, your dog’s daily routine can put a lot of strain on your home’s flooring. Sharp claws can dig into soft surfaces. Mud and snow melt can seep into cracks and lead to warping. Frequent traffic from excited paws leads to scuff marks, discoloration, and visible wear patterns.
Beyond aesthetics, some flooring materials simply can’t withstand the volume of wear that active dogs bring. Hardwood may look beautiful, but it scratches easily and requires refinishing over time. Carpet traps fur, odors, and allergens, and it’s prone to staining and matting. Laminate, though tougher than hardwood in many cases, can still be vulnerable to water damage and lifted edges.
Choosing the right flooring isn’t just about damage control. It’s also about ensuring your pets are comfortable and safe. Slippery surfaces increase the risk of joint injuries, especially in older dogs. Cold floors in winter can be unpleasant for dogs used to warm trails and soft earth. Balancing durability with comfort is crucial when designing a pet-friendly home.
Why Luxury Vinyl Tile is a Smart Choice for Dog Owners
Luxury vinyl tile (LVT) has rapidly become a favorite among homeowners with dogs, and for good reason. It offers a rare combination of visual appeal, resilience, and practicality. More specifically, scratch resistant luxury vinyl tile for dogs offers peace of mind for anyone with a pet who tends to run, slide, or dig indoors.
LVT is constructed with multiple layers, including a tough wear layer on top that resists scratches, scuffs, and everyday abrasions. This layer acts as a shield against sharp claws and rough play. Many luxury vinyl products also feature textured finishes that improve traction, reducing slipping for dogs who love to sprint through the house after a hike.
Another major benefit of luxury vinyl tile is its water resistance. Muddy paw prints, accidental spills from the water bowl, or a wet dog fresh from a swim aren’t a threat. The material won’t swell or buckle the way hardwood or low-end laminate might. In areas like Bend, where snow and rain are part of daily life in many seasons, this waterproof quality makes LVT a perfect match for local lifestyles.
The designs available in luxury vinyl have also evolved dramatically. You can find LVT that mimics the appearance of hardwood, stone, or ceramic tile, allowing you to enjoy a high-end look without sacrificing function. Plus, it’s easy to clean with a simple sweep and mop routine. For busy pet owners, that’s a huge time saver.
Top Considerations When Choosing Dog-Proof Flooring
Not all vinyl is created equal, and not all “pet-friendly” labels are backed by true performance. When shopping for flooring, focus on these important features to ensure you’re investing in something that can keep up with your dog.
First, look at the wear layer thickness. A thicker wear layer (measured in mils) generally means better resistance to scratches and scuffs. For homes with dogs, a wear layer of 20 mils or more is often recommended. Some commercial-grade luxury vinyl tiles are built to withstand even more intense use and are ideal for homes with multiple pets.
Next, choose a product with added slip resistance. Many modern LVT products include embossed textures or anti-slip coatings to help pets maintain their footing, which reduces the risk of injury. This is especially important in homes with older dogs, puppies learning coordination, or breeds prone to hip and joint issues.
Also, consider the acoustic properties of your flooring. Dogs can be noisy as they move around the house, and some materials amplify that sound. Luxury vinyl can include sound-dampening backing layers that soften the click-clack of claws and create a quieter, more peaceful indoor environment.
Lastly, keep maintenance in mind. Even the most scratch resistant luxury vinyl tile for dogs needs to be cleaned regularly to maintain its appearance and hygiene. Fortunately, most LVT products require minimal upkeep, just routine sweeping and the occasional damp mop with a mild cleaner.
The Bend, OR Lifestyle and Flooring Needs
Bend, OR is known for its active, outdoor lifestyle and stunning natural surroundings. Residents here often prioritize sustainability, adventure, and community, and their homes tend to reflect those values. For dog owners in this part of the country, flooring needs to align with both aesthetic and practical priorities.
Luxury vinyl tile is particularly suited to Bend’s climate and culture. Winters bring snow and ice, springs and summers often come with dust and grit from the high desert, and dogs are part of the daily rhythm of life. Whether you’re returning from a ski day at Mt. Bachelor or a kayaking trip on the Deschutes River, your flooring must be able to handle wet gear, dirty paws, and spontaneous indoor wrestling matches.
Additionally, many homes in Bend embrace a natural aesthetic, with wood tones, stone-inspired textures, and earthy palettes. The wide variety of design options available in luxury vinyl tile allows homeowners to stay true to that rustic-modern Bend style while ensuring durability for their four-legged adventurers.
Several local flooring retailers in Bend now stock pet-friendly flooring options, including scratch resistant luxury vinyl tile for dogs, with consultations tailored to lifestyle and budget. Supporting local businesses in your area also means tapping into firsthand knowledge of what works best for homes dealing with regional weather patterns and pet challenges.
The Right Flooring for a Pet-Forward Life
Choosing the best flooring for your home when you have dogs is a decision that impacts your everyday comfort, your home’s appearance, and your peace of mind. In a place like Bend, OR, where life is lived outdoors as much as in, your floors need to be tough, practical, and stylish.
Scratch resistant luxury vinyl tile for dogs offers a compelling solution for pet parents who want it all: durability, visual appeal, safety, and ease of maintenance. Its water-resistant properties, claw-proof surfaces, and anti-slip textures make it ideal for households with active pups who bring joy and chaos in equal measure.
As your dogs roam through forests, bound through rivers, and curl up by your side at the end of the day, your flooring should stand strong underfoot. Investing in the right materials ensures that your home remains a sanctuary for both humans and pets, no matter how wild the adventure gets outside. With the right scuff-resistant flooring, you won’t just be protecting your home; you’ll be embracing a lifestyle where your dogs are free to be exactly who they are: happy, messy, and full of life.
Need a Local Flooring Store Near You?
We’d love to help bring your next project to life! At Northwest Tile Supply, Inc., our knowledgeable and friendly team is here to guide you through our wide selection of high-quality stone and porcelain tiles. Whether you’re a contractor tackling a big job or a homeowner planning a renovation, our showroom in Bend is the perfect place to get inspired and find exactly what you need. Give us a call or stop by today—we’re excited to work with you and help make your vision a reality!